Pages

Friday, May 31, 2013

Stretching Out of my Comfort Zone


I loved this inspiration piece from Saturday's challenge site Jennspendants but until I
saw Dina's card today I wasn't sure I could do it. Thanks for the push with the
challenge to paint or freehand a shape then add line details to it.  I actually 
watercolored this free hand then added marker lines to it.  I added a color wash and 
shading around my images and stamped my verse in Versafine Onyx.
The finished product (a CASE of a card by Twinshappy aka Stacy). Hers was a gorgeous Christmas Card.

Here's the start of my card with my branch watercolored through the reverse of a Tim Holtz branch die cut. I penciled in my bird then watercolored with Raspberry Ripple, Blushing Bride and Regal Rose. I used black marker for the beak, eye and feet. I used the pinks for my blossoms.


Here's what it looks like after I've added in the details-wish I hadn't gone with the brown lines in the flower centers, but once you start you're committed!

Thursday, May 30, 2013

Jumpin on the Gelli Bandwagon

I admit it, I'm a technique junky! I've always got to try the latest thing. I was reluctant to join in the Gelli Plate craze, however, because of the cost of the plate. I wasn't sure I'd actually like it, or be able to make cool prints with it and didn't want to spend precious craft $$ on something I wasn't sure of. Enter my splitcoast friends who told me about a way to make my own gelatin plate.Check out Linda Germain's blog I even had some gelatin that I bought at an Amish country store that sells things in bulk. Here are my first two cards and some pictures of printing in process.


The main image panel was blue acrylic inks that I rolled my Rough Texture wheel over. After this print had dried, I added another layer with a ghost print from a purple stencilled print. The two strips are from packing tape that I used to pull the dried paint off some bubble wrap that I'd used on the plate. I also picked up some text from the newspaper I'd laid down on my work surface (the first time was an accident, but I grew to like the look so I started doing it on purpose).
Stamps: Upsy Daisy, Rough Texture Wheel
Paper: Concord Crush, Baja Breeze, Marina Mist, White, Tissue Paper
Ink: Versamark, Concord Crush, Acrylic Paints
Accessories: Bubble Wrap, Plaid Stencil, Gelatin Plate, Chevron ef, Clear ep, Birds and Blooms Die, Silver brad, Wisteria Reinker, Rhinestones, Burlap, Sponge
Techniques: Gelatin Plate Printing, Tissue Paper Flower, Sponging, Dry Embossing

Read more: http://www.splitcoaststampers.com/gallery/photo/2377659#ixzz2UngCoG2B
Today's ways to use it challenge was to add doodling to a card. I remembered this print with hearts and decided to turn it into an anniversary card. I doodled onto my main panel first with the teal pen, but it didn't show up well enough so I took a Sharpie pen and went around again. I also doodled around my card base-this is a 5x7" card.
Stamps: none
Paper: White, Black
Ink: Acrylic Paints, Marker, Sharpie Pen
Accessories: Heart punches, Ribbon, Brad
Techniques: Gelatin Plate Printing, Brad Bow, Doodling

Read more: http://www.splitcoaststampers.com/gallery/photo/2377924#ixzz2UngRJCUB
Here is the pile of prints I made the first day I played with the gelatin. You can see the smaller plate I made in a Tupperware in the right lower corner. I ended up melting all my pieces back together and re-setting it.
These were my favorite prints of the day: bubble wrap, mesh tape and my unmounted stitches wheel played a part in these!

I read another technique where you let your paint dry on the Gelli plate then remove it with packing tape or cool laminate paper. Since I was using a gelatin plate instead of the Gelli, I modified the technique by pulling the dried paint off the stencils, etc that I used in the printmaking. Here's what the packing tape looks like after I've placed it down over my large circles and pulled off the dried paint this was my oops moment with the newsprint ;).

This time I pulled the bubble wrap through the stencil.


I then put this back on the large stencil to pull off the paint around the large circles.
The bottom piece is the result of that two step process laid down over a piece of white card stock.
Pulling off a background stamp.
This one was pulled first off my Dotted bg stamp then the pink came from a stencil.
Here's what it looks like laid down over a purple bg.


Monday, May 27, 2013

Last Week Guest Designing for the Color Challenge

I've had so much fun this past month as a guest designer for the Color Challenge on splitcoaststampers.com.  I love the color's Kim chose for this week: Island Indigo, Pool Party and Lucky Limeade with a dessert of piercing. I was inspired by necklaces I saw on this past week's Inspiration site Jennspendants. I finally took the time to make a light box for taking photos of my cards and on this gloomy, rainy Memorial Day it sure was worth it!
This one is a reverse mask circle sponged with the 3 colors and stamped with a tree inked with Limeade then with the trunk and branches inked with a Chocolate Chip marker. I pierced around my circle and in the corners of the card base. I sponged my sentiment as well using a Word Window punched mask. I made a brad bow using the closest blue ribbon I had which was an oldie-Blue Bayou! This one was inspired by this beautiful tree necklace
Stamps: Thoughts and Prayers
Paper: Pool Party, Island Indigo, Whisper White
Ink: Pool Party, Island Indigo, Lucky Limeade
Accessories: Striped Embossing Folder, Occasions Piercing Guide, Mat Pack, Piercing Tool, Star Brads, Blue Bayou Stitched Ribbon, Punches: Modern Label, Word Window, Corner Rounder, Chocolate Chip Marker
Techniques: Masking, Sponging, Piercing, Dry Embossing

Read more: http://www.splitcoaststampers.com/gallery/photo/2376966#ixzz2UYLg0Pfg

I went in the Mixed Media direction with this one base on another tree necklace. I started with a dictionary page that I coated with Gesso. I used MS chalk inks to add color then a wet paintbrush and a sponge with the 3 colors. I die cut my tree and added texture to it and the base with the Distressed Texturz plate. I die cut my birds and sponged them a bit too. I inked my sentiment with Versamark first then the Indigo and embossed in clear.
Stamps: Print Works-Give Your Burdens
Paper: Kraft, Dictionary Page, Chocolate Chip, Island Indigo
Ink: MS Chalk Inks, Lucky Limeade, Island Indigo, Pool Party, Versamark, Early Espresso
Accessories: Matte White Gesso, foam brush, paintbrush, sponge, Clear ep, Distressed Texturz Plate, Memory Box Dies-Bare Tree and Resting Birds, CM Circle Cutting System, Corner Rounder Punch
Techniques: Sponging, Dry Embossing, Mixed Media

Read more: http://www.splitcoaststampers.com/gallery/photo/2376982#ixzz2UYMWPx4Z
 

Friday, May 24, 2013

Not Your Typical Mixed Media

Today's Mixability Challenge  was to use both rough and smooth elements on our cards. I made two using Espresso and Gold.
This one is a CASE of a card by our Queen for the Day Stamp Muse, Emily. Her card was in Navy and gold, but I had the Mocha Morning dp that was a perfect fit for the CASE.
Stamps: Medallion, Wanted, Family Reunion, inside sentiment from All Year Cheer
Paper: Early Espresso, Brushed Gold,Mocha Morning and Neutrals Patterns Pack dp
Ink: Versamark, Early Espresso
Accessories: Early Espresso ep, CB Border ef, Tulip Frame ef, 3/4" circle punch, sponge
Techniques: Embossing, Dry Embossing

Read more: http://www.splitcoaststampers.com/gallery/photo/2375647#ixzz2UEkb4AER

I had made the embossed panel thinking I'd use it behind the piece on my previous card, but when it didn't work for that I designed another card using it.
Stamps: Rubber Stampede: With Deepest Sympathy
Paper: Early Espresso, Brushed Gold
Ink: Encore Gold, Versafine Onyx
Accessories: Gold embossing powder, M-Bossabilities Reverence ef, Ticket Corner Punch, Ribbon
Techniques: Dry Embossing, Embossing

Read more: http://www.splitcoaststampers.com/gallery/photo/2375636#ixzz2UEkpm9yh

Tuesday, May 21, 2013

Color Challenge!

I'm having a lot of fun guest designing for the Color Challenge on splitcoaststampers.com.
This was the card I made as a sample for the challenge. I sponged a sky, tore some dirt for the bottom and in the truck, markered a sentiment and added some embossed tires with screwbrad hubcaps!
Stamps: By Land, Alphabet Soup
Paper: Marina Mist, Early Espresso, Cherry Cobbler, Whisper White
Ink: Marina Mist, Cherry Cobbler
Accessories: Markers, Cloud, Moon & Stars Template, Chevron Embossing Folder, Ticket Corner and 1/16" Circle Punches, Earlly Espresso & Marina Mist grosgrain ribbons, staple, Dimensionals, Screwhead Brads
Techniques: Sponging, Tearing

Read more: http://www.splitcoaststampers.com/gallery/photo/2374187#ixzz2Twd4Fcpd

Here is a second project in these colors with LOTS of fun mixing of media and layers of "stuff"!

Here's the humble beginning piece-a leftover from a Goodwill purchase-they'd torn off the bottom of the tag so I added some Espresso to get the proportion back.

Modge-podged a dictionary page over this.

Skim coat of matte white Gesso

Sponged through some stencils.

Stamped a hot air balloon then masked over it to add some details to the top. Here's where I added images from the Clockworks set.


I didn't like the way the circles showed through what should have been a solid balloon so I took a wet brush and bled the Cherry around the blank areas. I let this bleed down a bit and also took a Marina marker on acetate, added water to that and splattered the blue ink around too.
I added some more red from using the border stamp from Plane and Simple and added a couple of metal pieces and a crumpled Baja Seam Binding piece. I also sponged more color around and backed the whole tag with Early Espresso.
Stamps: Plane and Simple, Clockworks, Glitz-Afternoon Muse
Paper: Early Espresso, Marina Mist, Dictionary Page, Manilla Tag
Ink: Marina Mist, Cherry Cobbler, Early Espresso, Versamark, Versafine Onyx
Accessories: Early Espresso embossing powder, Plaid Stencils, metal charm, Hodgepodge hardware, Baja Breeze seam binding, paintbrush, markers, Gesso, Modge Podge
Techniques: Sponging, Distressing, Tearing, Splatter, Collage

Read more: http://www.splitcoaststampers.com/gallery/photo/2374410#ixzz2TwgzEOMY


I had so much fun with the colors and with making the Mixed Media piece yesterday that I decided to make another today.
Stamps: Nature Walk, Happiest Birthday Wishes, Medallion, Itty Bitty Backgrounds
Paper: Early Espresso, Pink Paisley dp, Cherry Cobbler, sheet music, Marina Mist
Ink: Early Espresso, Cherry Cobbler, Marina Mist, Versamark
Accessories: Early Espresso Embossing Powder, matte white Gesso, Modge Podge, sponge, paintbrush, M-Bossabilites Reverence ef, CB Rebecca ef, Square Lattice ef, Cherry Cobbler Seam Binding, Antique Brad
Techniques: Distressing, Sponging, Dry Embossing, Embossing

Read more: http://www.splitcoaststampers.com/gallery/photo/2374937#ixzz2U4SRy1b1

Monday, May 20, 2013

Wedding Time Too!

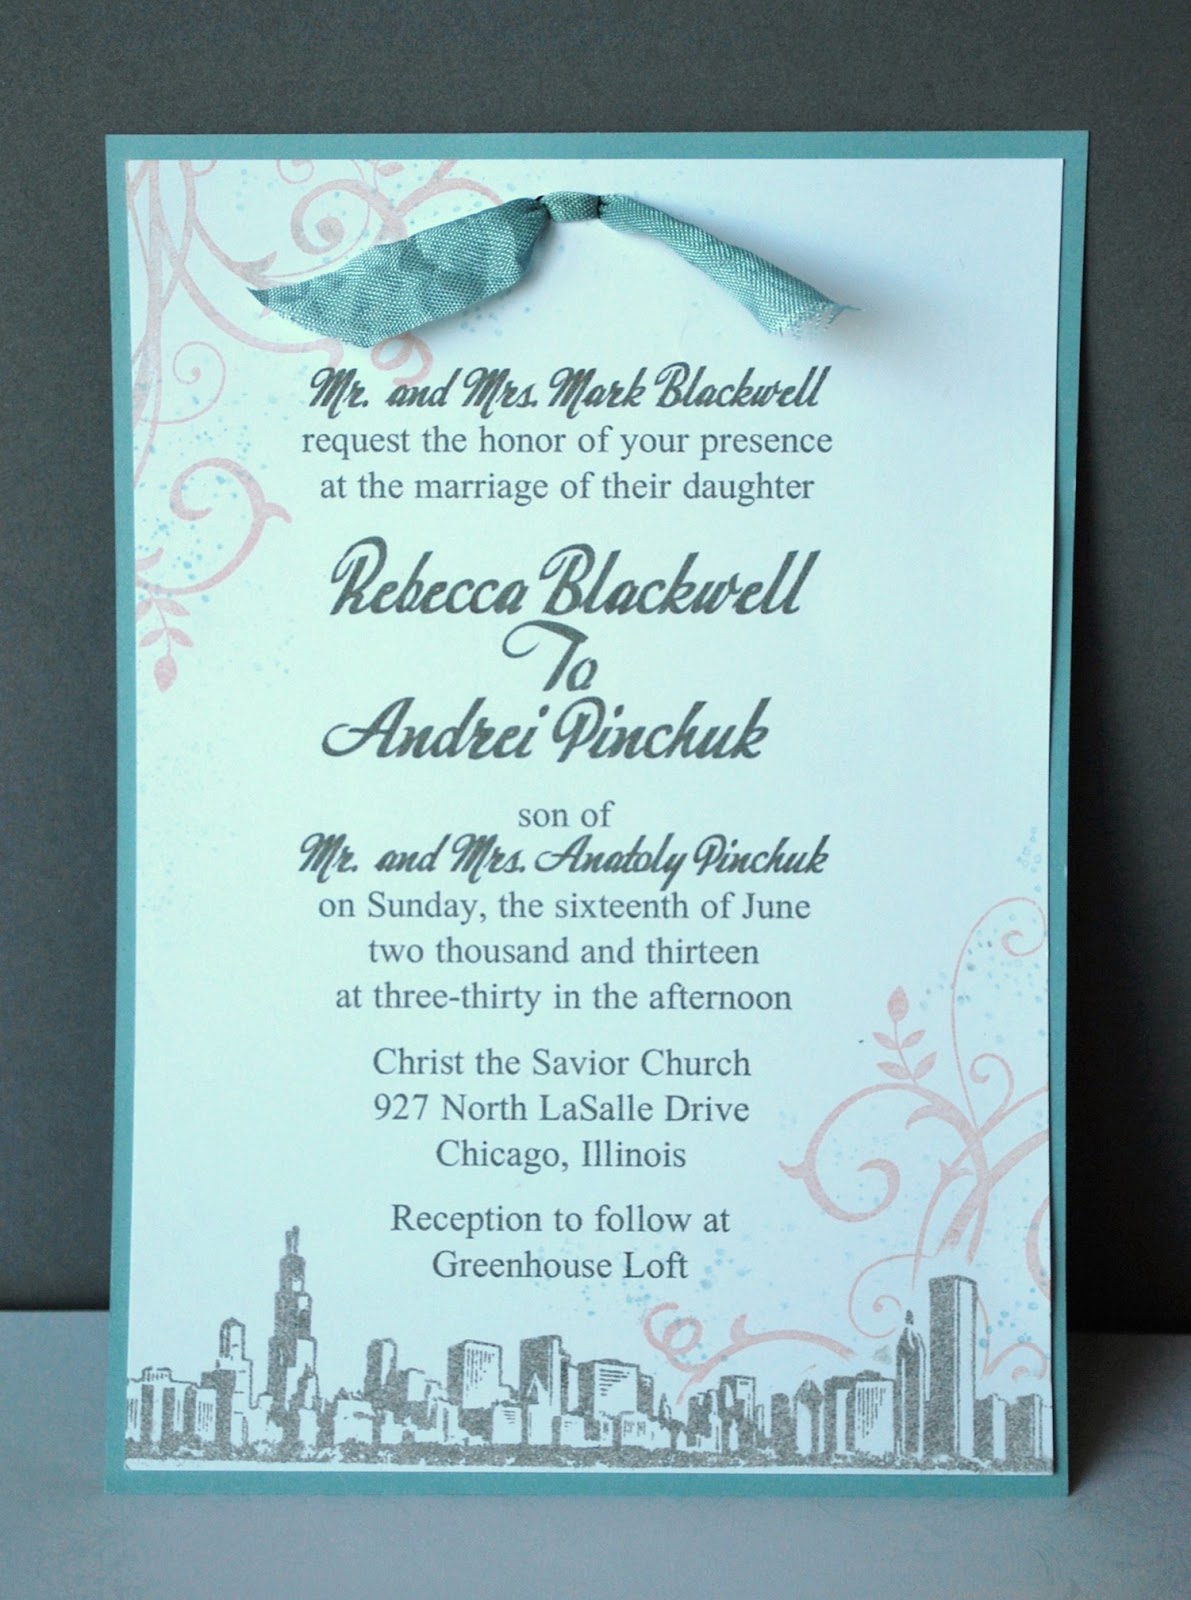
Looking forward to the weddings coming this summer. My niece has only four more weeks to wait. Anna and I had fun attending her shower on Saturday. Here are the cards I put together using her colors....I made her invitations so I'm quite familiar with the colors!
The bride and groom to be live in Chicago and my niece's colors were inspired by the beautiful sunrise/sunset skies and skyline from her drives to and from work. She described what she wanted as "urban and elegant" I stamped my skyline in Smokey Grey and masked over it then stamped my flourish in Blushing Bride and added Baja Breeze spatter. Tsukineko was kind enough to email me the RGB code so we could get the printed part to match the stamped ink color.
Stamps: Baroque Motifs, Itty Bitty Backgrounds, Viva Las Vegas-Chicago Skyline
Paper: Baja Breeze, Whisper White
Ink: Baja Breeze, Blushing Bride, Versafine Smokey Grey
Accessories: Double hole punch, Baja Breeze seam binding
Techniques: Masking

Read more: http://www.splitcoaststampers.com/gallery/photo/2354762#ixzz2Tq4mMkQW


I embossed a Tulip frame in Blushing Bride then stamped my Jumbo Peony from Stampendous in the same ink color and added a flourish from the set stamped in Baja. I sponged along the edges in the same colors.I added some Sakura Clear Star Gelly Roll Pen accents and covered them with Crystal Effects. I stamped the sentiment in Versafine Smokey Grey and added my pleated Blushing Bride ribbon with rhinestone accents.
Stamps: Stampendous Jumbo Peony, Hampton Arts sentiment
Paper: Blushing Bride, Whisper White
Ink: Blushing Bride, Baja Breeze, Versafine Smokey Grey
Accessories: Sakura Gelly Roll Pen-Clear, Crystal Effects, Blushing Bride pleated Ribbon, Rhinestones
Techniques: Sponging

Read more: http://www.splitcoaststampers.com/gallery/photo/2373151#ixzz2Tq49EIlC
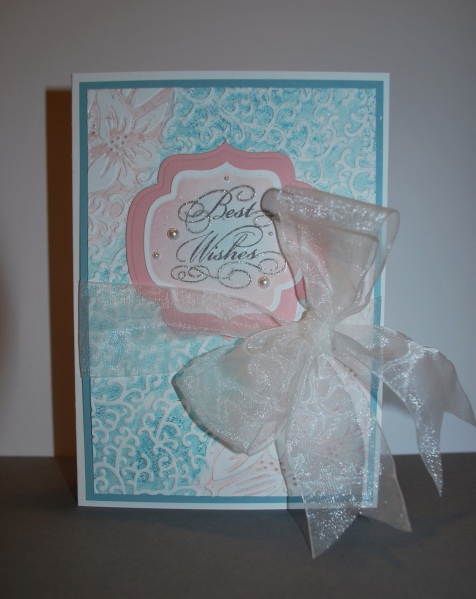
This will be the card I'll use for our wedding gift. It is a CASE of Jill's beautiful gatefold card.This is a 5x7" card as the ef is larger and I loved the look of the piece I embossed and couldn't bring myself to cut it down to a smaller size. The MBossabilities ef was inked on the negative side with Baja and Blushing Bride and embossed onto Whisper White. I added shimmer spray to it and the sentiment which has gelly roll pen accents with Crystal Effects over it as well as the added pearls. I sponged it while still in the die.
Stamps: Elegant Greetings
Paper: Whisper White, Baja Breeze, Blushing Bride
Ink: Blushing Bride, Baja Breeze, Versafine Smokey Grey
Accessories: SB MBossabilities Reverence ef, SB Nestabilities Labels Nine, Sponge, Home made shimmer spray with frost white shimmer paint, Sakura Gelly Roll Pen-clear Star, pearls, white organdy ribbon, spritzer, Crystal Effects
Techniques: Faux Letterpress, Shimmer Spray


Wednesday, May 15, 2013

Graduation Time!

It's that time of year again....time to make graduation and wedding cards! One of my favorite things to do for these, is to use parts of the announcement/invitations to create my cards. For this one I punched the circular element from the announcement and planned my card around that. The main panel is also paper from the announcement that I embossed and added gold ink to.

This is one I did a few years ago for a wedding. Both the layered flower and the border strip were cut/punched from the invitation.

Tuesday, May 14, 2013

Faux Bokeh

     Our technique challenge this week was to create a faux Bokeh effect. I wasn't familiar with the term so I went to google for help and fell in love with the first picture I saw. I'm a big blue fan and I love leaves so I decided to try to recreate the look on my card.


I found this tutorial by Betsy Veldman to be really helpful. I stamped my leaves first with Daffodil Delight with Pumpkin Pie thumped onto the leaf image. I then added more Daffodil as the image isn't quite solid. I then masked these leaves to add the Bokeh effect. I started by sponging Pool Party onto my Whisper White card stock. I then added Tempting Turquoise and Pacific Point concentrating the color onto the corners. I used the idea of using double stick tape to use the back side of a small circular stamp to add my circles. I used the same 3 colors stamping full strength as well as stamped off. I also stamped a few in Whisper White. I started with a die cut branch (Little Leaves die with leaves cut off) but decided I wanted a flat effect so I used a marker instead. I also decided to stamp and fussy cut another leaf and layer this, slightly popped over one of the leaves. I also added Crystal Effects to both of the leaves. If you don't have this stamp set yet, you might want to grab it before it retires....it is definitely one of my faves!
Stamps: French Foliage
Paper: Pumpkin Pie, Whisper White
Ink: Pool Party, Tempting Turquoise, Pacific Point, Whisper White, Daffodil Delight
Accessories: Daffodil Delight, Pumpkin Pie, and Early Espresso markers, sponge, Crystal Effects
Techniques: Masking, Sponging, Thumping

Read more: http://www.splitcoaststampers.com/gallery/photo/2371356#ixzz2TKKYp3rH

Thursday, May 9, 2013

Who Can Resist?


Are you like me when you see a new technique? I get ideas popping and love to try new things. A while back Dina Kowal posted a tutorial that splitcoast featured using a technique that was new to me, pencil resist. Instead of heat embossing or using some other form of water based ink-resistant media like crayon, you use waxy colored pencils to color the area you wish to resist the ink you then put on in the 2nd step. My 10yo DD loves leopard print and bling so I was thinking of her when I made this, but it isn't quite right for her. Guess I'll just have to try again....maybe in pink! 
Stamps: The Cat's Pajamas-Postage set?
Paper: Black, Brushed Gold, Mocha Morning dp?, Very Vanilla
Ink: More Mustard, Cajun Craze, Versafine Smokey Grey
Accessories: Black detail embossing powder, sponge, pleated black ribbon, sponge, Offray gold mesh ribbon, gem flourish and gems, foam squares, TCP-Stamp Trio die, Labels Nine Nestabilities, charm, Plaid-leopard print stencil
Techniques: Pencil Resist, Embossing

Read more: http://www.splitcoaststampers.com/gallery/photo/2369701#ixzz2SrKre0oW

Here's what my panel looked like before I sponged with More Mustard and Cajun Craze.


Tuesday, May 7, 2013

CASEing Peggy

Peggy aka jasonw1 was our Queen for the Day last week. She has an amazing gallery full of beautiful, feminine cards. I had so much fun that I couldn't stop at just one!
 
This is a CASE of Peggy's beautiful Butterfly and Pink Roses card. I used the 3 panels with a flourish die cut in white laid extending over all three. I also kept the scallop trim on the middle panel, but I used layered punched flowers instead of roses and a different layered butterfly with Gelly Roll Pen glitter accents.
Stamps: Messages for Mom
Paper: Pretty in Pink, Whisper White
Ink: Pretty in Pink (flowers with: Regal Rose, Pretty in Pink and Pink Pirouette sprayed with home made shimmer spray)
Accessories: Cheery Lynn Fanciful Flourish Left die, TCP Lacey Butterfly die, MS Hydrangea Pen, Sakura Gelly Roll Pen-Clear, Scallop Border Punch
Techniques: Wrinkle Free Distress with shimmer spray instead of water

Read more: http://www.splitcoaststampers.com/gallery/photo/2367288#ixzz2Sd3o6hQO
This is basically the same sketch using the reverse of the die cut. I kept the panel whole and didn't put a layer behind the butterfly this time. I added Liquid Pearl accents instead of the glitter.
Stamps: Stampabilities You're in my Thoughts
Paper: Pink Pirouette, Whisper White
Ink: Pretty Regal Rose (flowers with: Regal Rose, Pretty in Pink and Pink Pirouette sprayed with home made shimmer spray)
Accessories: Cheery Lynn Fanciful Flourish Left die, TCP Lacey Butterfly die, MS Hydrangea Punch, Pearl Pen
Techniques: Wrinkle Free Distress with shimmer spray instead of water, Scoring

Read more: http://www.splitcoaststampers.com/gallery/photo/2367713#ixzz2Sd3ZEZC4
This is a CASE inspired by  Peggy's Birthday Card I used a different embossing folder but did the same pink sponging. I made an Organza brad bow and sponged in the die over my sentiment.
Stamps: Elegant Greetings
Paper: Pink Pirouette, Whisper White
Ink: Regal Rose
Accessories: Cherry Blossom ef by Nellie Snellen, Nestabilities Circles, Sponge, Whisper White Organza, Antique Brad
Techniques: Dry Embossing, Sponging, Sponging in the DIe

Read more: http://www.splitcoaststampers.com/gallery/photo/2367708#ixzz2Sd3Nl6je


Monday, May 6, 2013

Mixing Up Techniques


This mixed media piece began with the pounded flower technique.
Here's what the pounded flowers gave me. I had to fiddle around with the sandwich and I think the warp in my acrylic plates affected the amount of color I got.
I took a wet paintbrush to pick up ink from the lids of my inkpads (Pear Pizzazz for the stems and Wisteria Wonder and Concord Crush for the flowers)

I added a color wash with Ballet Blue as well as putting a bit of blue in the flowers. I also took markers to add more definition to the flowers and stems.

I used a Sahara Sand marker to shade around the flowers. I added some Impressionist "dots" in Plum to the flowers.

Last media added was chalk ink in two colors of blue around the flowers and on the edges. I scored a frame in my Pear card base, framed the panel in Concord Crush and threw on a few purple gems. 

Stamps: Wonderful Words
Paper: Pear Pizzazz, Concord Crush, Watercolor Paper
Ink: Wisteria Wonder, Concord Crush, Pear Pizzazz, MS chalk ink
Accessories: Markers: Perfect Plum, Wild Wasabi, Sahara Sand, Paintbrush, gems, Scoring Board
Techniques: Scoring, Pounded Flowers, Watercoloring

Read more: http://www.splitcoaststampers.com/gallery/photo/2368241#ixzz2SZsxVoGi

Wednesday, May 1, 2013

Variations on a Sketch


All three cards are made using a fun sketch from Korin (sweetnsassystamps) on today's sketch challenge at splitcoaststampers.com 
This one features colors from this week's color challenge: Primrose Petals and Cameo Coral


Flipped the sketch around right to left on this one in order to use my umbrella man die cut on the right side. I used a vellum circle for my circle element and double cut the grey banner to fit behind the smaller sponged sentiment banner.

For this, I used a reverse mask from a sheet I'd die cut the leaves from. I'm trying to use some colors that don't come natural to me: Summer Starfruit, Gumball Green and Old Olive. I added some clear embossing to the debossed image on the circle and spritzed with homemade Artichoke spray on the vertical panel.