Pages

Monday, September 2, 2013

Double the Inlay

     I love to use the inlaid embossing technique, but I've been admiring the use of tessaduck/Brenda's inlaid die cuts as in this pretty card here
     I decided to cut some extra pieces when I decided to use the lattice die as a stencil today on this CASE of a card by Lydia/understandblue
     I masked around the diecut that I laid down then used paint dauber, chalk ink direct to paper and sponged ink.
     ANYWAY....I diecut three different colors with the Lattice die and then pieced them together in a couple more cards. The double inlay comes into play because both cards are glued together then embossed in the Square Lattice embossing folder to create an inlaid look.

       This one is a 4 1/4" square card where I used the Cherry Cobbler lattice diecut with the Always Artichoke "petal" pieces and the Crumb Cake diamonds on a base of what I think is a piece of Baked Brown Sugar. The sentiment is double punched with the Designer Label punch backed by two Artichoke pieces punched the same way.
     This one takes the reverse diecut piece of Crumb Cake glued onto a Vanilla base. The Artichoke Lattice diecut has the Cherry Cobbler petals and I left the diamonds open. The sentiment had a circle punched piece layered over Artichoke with the corners ticket punched.
 

Sunday, September 1, 2013

Stencil Mania

     I'm not always one to jump on the latest trend, but I'm loving the use of stencils. Whether you use them to add depth to a background, or as the star of the show, stencils can be an inexpensive asset to your card-making arsenal.

     Here's the card I made as a sample for this week's CAS challenge to use stencils.  I used a leaf stencil for my main image sponging then stamping through the stencil. I then masked the leaf, sponged around it and after masking rolled the Timber Wheel "behind" the leaf.  I sponged around the edges of the card as well. This stencil left gaps where the veins of the leaf would be, but I decided to paint in those gaps and also painted around the leaf as well for added depth.
      Here's an example of spraying through a stencil.  I loaded up a mister with water and a mix of Pacific Point, Tempting Turquoise and Island Indigo reinker drops. I masked and sprayed through my stencil then added the punched Mosaic pieces in six blues and stamped my sentiment.

Saturday, August 31, 2013

Drip-Spatter-Blow

     This week's Mixed Media Challenge was to use a water technique to drip or blow ink around on our pieces.  I made three cards.
     The first card started with a piece of paper I'd prepared using the CitraSolv Magic Technique that Lydia/understandblue shared a long time ago. It begins with a page from a National Geographic magazine and  uses a solvent to dissolve the ink and smear it around and then a plastic bag or towel to remove some of the ink. I rolled some white ink onto this paper and stamped the diamond pattern on the right. I then loaded up a brush with water and Island Indigo ink and spatter it around. I used some more watery ink to add to the larger drips then used gravity to drip the spatters down.


Stamps: Clockworks, Timber wheel,
Paper: So Saffron, Island Indigo, Riding Hood Red, National Geographic Page
Ink: Island Indigo, Whisper White, Versamark
Accessories: Citra Solv, foam brush, straw, wet paintbrush, confetti, Tim Holtz Distress Embossing Powder-Mustard Seed, Marker
Techniques: CitraSolv Magic, Spatter, Blown Spatter

Read more: http://www.splitcoaststampers.com/gallery/photo/2417781#ixzz2dZCiVNbm
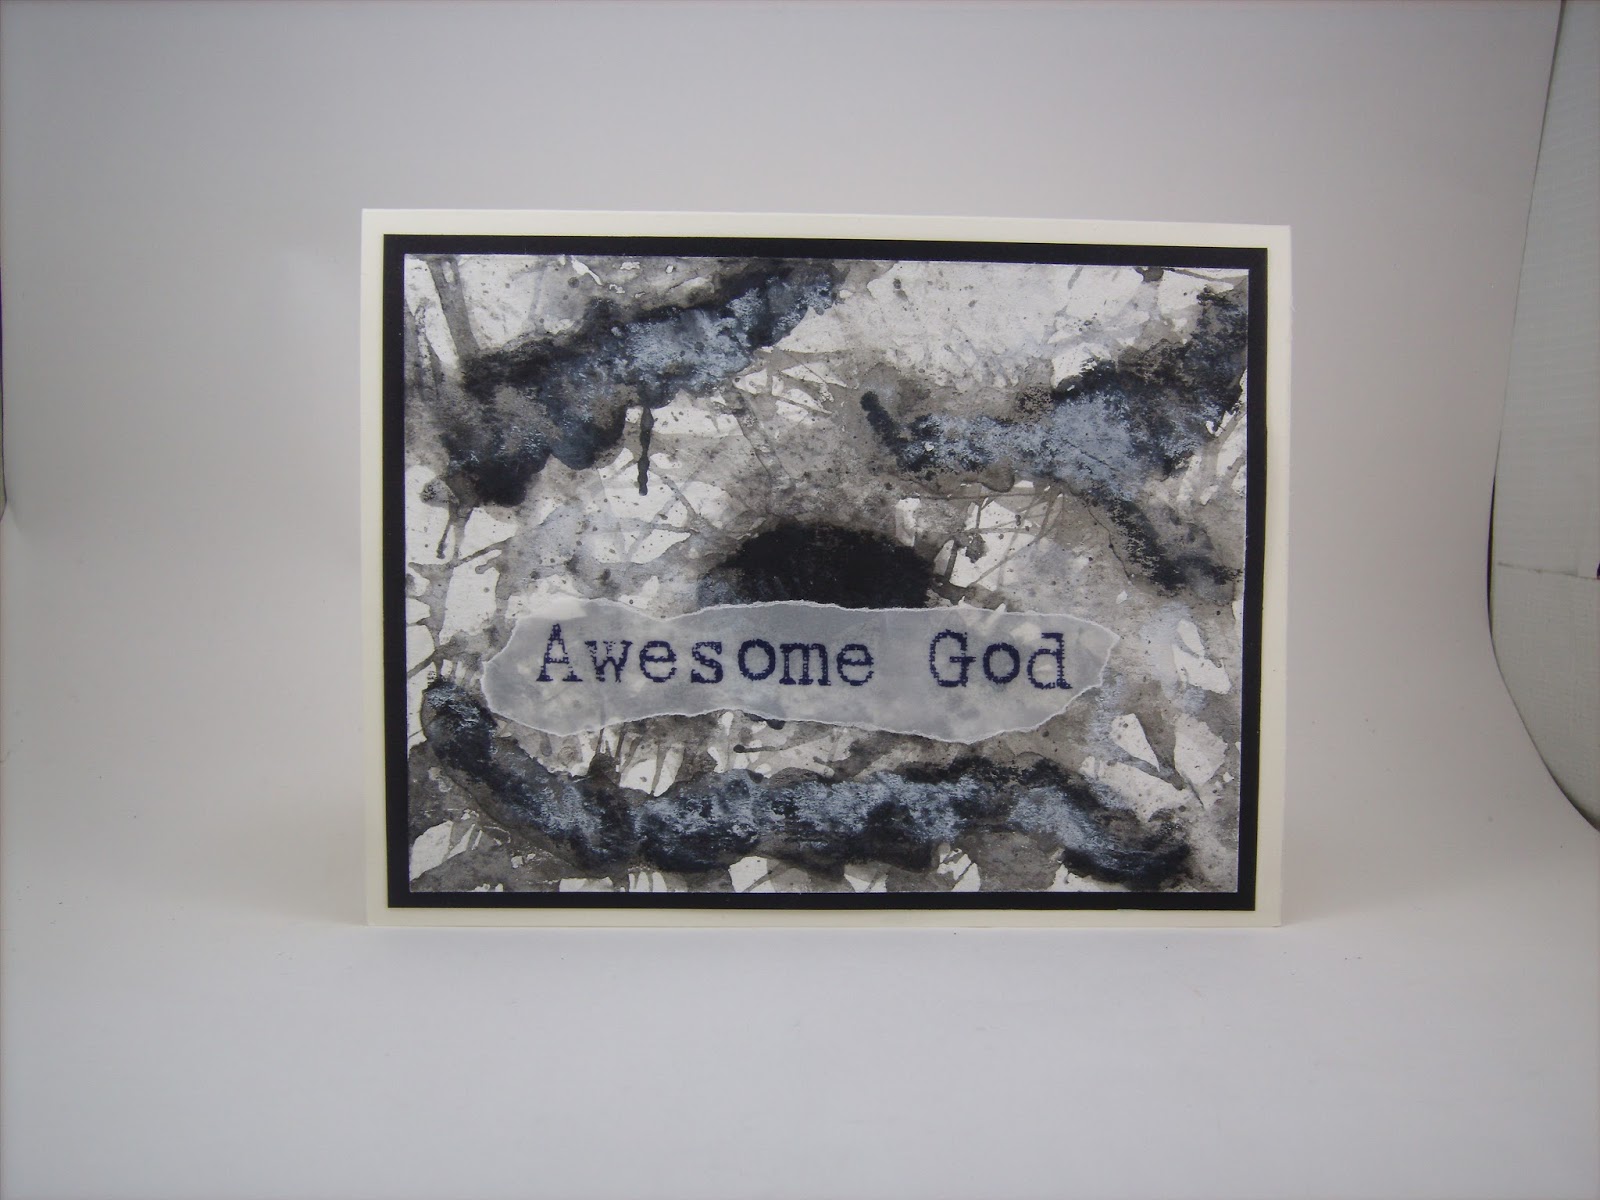
     This one features Black and White Gelato ink watered down and spread around.
Stamps: Verve: Hebrews 11:1
Paper: White, Black, Watercolor Paper
Ink: Gelatos, Basic Black, Versafine Onyx
Accessories: wet brush, eyelet ribbon, pewter ep
Techniques: spatter, drip, embossing

Read more: http://www.splitcoaststampers.com/gallery/photo/2418061#ixzz2dZDQDUxb
Scribbled the Gelatos onto the watercolor paper

Got the black good and wet and watched it run
s

Added water to the white areas 
Using my heat gun to spread the ink down and dry it.

Here's the second card

The second piece good and wet.

Using two straws to blow the ink around

White gelato added over the top


More white added over top some of the black

Wet brush with Basic Black ink used to spatter a fine spray over the top.


Thursday, August 29, 2013

Remixed Wedding Invitations

      Last summer when we made my DD's wedding invitations we had a slight miscalculation and ended up with lots of extras.  Yesterday, I took one and re-made it over into an anniversary to send the happy couple for their first anniversary.
 This has two coats of Gesso over the stamped/printed invitation and uses a leftover rosette and pieces of dp that I used to make a banner for the head table at the wedding.
Stamps: Medallion, Vintage Vogue, Verve-Happy Anniversary
Paper: Elegant Eggplant, White, unknown dp
Ink: Elegant Eggplant, Whisper WHite
Accessories: TH Rosette die, 1" square punch for notches, Eggplant ribbon, Matte White Gesso

Read more: http://www.splitcoaststampers.com/gallery/photo/2417076#ixzz2dNjuZqYH

                     Here's the original invitation.
 The Medallion images were stamped in Elegant Eggplant and we printed the invitation info.
Today's Ways to Use it Challenge was to use angels and I decided to another mixed media re-do of the invite.
 Here's the bg with the first layer of toothpaste and the snowflakes in stamped off Pacific Point
              A close look at the angel in toothpaste.
     Here's the stencil placed back over the toothpaste so I can add a thick layer of Gesso over it. 
         First layer of Gesso in place and snowflakes stamped. You can see the gaps that the stencil left.
      I've added some Gesso to fill in the gaps and now I'm using a wet wipe to soften the snowflakes.
 
      Here's the final card with sentiment stamped, ribbon banners added, and gold stickles accents on the angel and in the centers of the snowflakes. You can see I used the same sketch from yesterday's sketch challenge.

Stamps: Medallion in bg, Inkadinkado-Snowflake, Hampton Arts-sentiment
Paper: White, Elegant Eggplant
Ink: Elegant Eggplant, Pacific Point, Tempting Turquoise reinker
Accessories: Gesso, Plaid angel stencil, gold stickles, toothpaste, Whisper White Organza Ribbon, gold mesh, purple ribbon
Techniques: Mixed Media, Stencilling

Read more: http://www.splitcoaststampers.com/gallery/photo/2417307#ixzz2dNl8pDME


Monday, August 26, 2013

Viva La Verve sketch meets Strong Anchor

     I decided to play along with Verve's August Sketch Challenges and try to feature some of the Verve stamps I won through participating in the Dare to Get Dirty Challenges on splitcoaststampers.com.  These two cards use this fun sketch and use the same stamp sets, dies and colors.
 Here are the two cards I made using the Verve set Strong Anchor with matching Nautical dies as well as the SU set The Open Sea.
I masked the edges of my dp and stamped the rope frame and added this layer to the sketch. The anchor is stamped in Island Indigo on Natural Ivory and has sponged Soft Sued accents. I tied a series of knots in some chunky twine as an accent.
Stamps: The Open Sea, Verve: Strong Anchor
Paper: Textured Soft Suede, Island Indigo, Natural Ivory, Soft Sky, retired hostess pack dp
Ink: Soft Suede, Island Indigo
Accessories: Houndstooth ef, Corner Rounder punch, CM Oval Cutting System, Verve Nautical Dies, Stampin' Dimensionals, sponge, twine
Techniques: Masking, Sponging, Dry Embossing

Read more: http://www.splitcoaststampers.com/gallery/photo/2416065#ixzz2d5NvtLbC
This one stays truer to the sketch and has an eyelet accented ship's wheel and sponged sky on the image panel. My oval is larger on this one as it the whole card.
 
Stamps: The Open Sea, Verve: Strong Anchor
Paper: Soft Suede, Island Indigo, Natural Ivory, Whisper White
Ink: Soft Suede, Versafine Smoky Slate, Midnight Muse, Island Indigo
Accessories: Houndstooth ef, Corner Rounder punch, CM Oval Cutting System, Verve Nautical Dies, Metallic Eyelets, Cropadile, Stampin' Dimensionals, Cloud Moon & Stars template, sponge
Techniques: Sponging, Dry Embossing

Read more: http://www.splitcoaststampers.com/gallery/photo/2415876#ixzz2d5ORlhsb

Sunday, August 25, 2013

Road Trip!

     This week's CAS Challenge is a theme challenge based on the theme-Road Trip.  I used some new toys for the challenge-a new stamp set and a punch to go along with it.
     For my sample card, I decided to make a stencil and create a one layer card.  I used my hexagon punch and a sheet of acetate to create a mask that I can use again.  I then sponged my bright colors for my first "layer."  I stamped some images in between the hexagons. My second "layer" was stamped black images. I did cheat just a bit by framing in black and using a colored base, but this is basically a one layer card.

Stamps: Around the World
Paper: Pumpkin Pie, Basic Black, Whisper White
Ink: Crushed Curry, Pumpkin Pie, Gumball Green, Pacific Point, Real Red, Basic Black
Accessories: Hexagon punch, sponge
Techniques: Masking, Sponging

Read more: http://www.splitcoaststampers.com/gallery/photo/2415885#ixzz2d2WM2dcO
     For my second card, I decided to try my hand at freestyle collage.  I used the same stamp set but stamped then punched my images. I used a strip of Chevron embossed black as my leap off point popping the images and adding an arrow clip.  I accented with some stickers and a couple of shapes in complementary colors, then stamped a couple of sentiments to round it off. Not sure how successful this is as a CAS card, but I like the look.
 
Stamps: Around the World
Paper: Bermuda Bay, Whisper White, Crisp Cantaloupe, Gumball Green, Pool Party, Real Red, Basic Black
Ink: Real Red, Bermuda Bay, Basic Black,
Accessories: Corner Rounder, Hexagon, 3/4", 1", 1 1/4" circle punches, Chevron embossing folder, Hang Up clips, Stampin' Dimensionals, Epic Day This and That Stickers
Techniques: Masking, Sponging, Freestyle Collage

Read more: http://www.splitcoaststampers.com/gallery/photo/2415943#ixzz2d2chGWGq      And here's a couple more with similar theme that are definitely NOT Clean and Simple. I made these during the Dare to Get Dirty Challenges.

Stamps: Petite Pairs
Paper: Not Quite Navy, More Mustard, Cherry Cobbler, Pear Pizzazz. Bo Bunny-Detour Icons and SImple Stories-Jet Set
Ink: Not Quite Navy, Versafine Onyx
Accessories: various circle punches, photo corner punch, square lattice ef, cutter kit distressing tool, dimensionals, Tim Holtz Steampunk ef
Techniques: Distressing, Crumpling, Sponging, Tearing

Read more: http://www.splitcoaststampers.com/gallery/photo/2403943#ixzz2d2a3Ah8K

Stamps: Lean On Me, Studio G Chevron
Paper: Sahara Sand, Not Quite Navy, More Mustard, Old Olive, Pear PIzzazz, Cherry Cobbler, Real Red, Black, envelope scrap, Bo Bunny-detour, Simple Stories-Urband Traveler
Ink: Versafine Onyx,
Accessories: Various circle punches, Chevron ef,
Techniques: Dry Embossing

Read more: http://www.splitcoaststampers.com/gallery/photo/2406120#ixzz2d2aNTrEi
     I also did a Mixed Media card a while back with the same theme. 
 
Stamps: Rough Texture Wheel, Studio G alphabet
Paper: Riding Hood Red, Vintage Violet, Map piece, October Afternoon dp
Ink: Soft Suede, Basic Black, Night of Navy
Accessories: Bitty Banners framelits, 1 3/4" circle punch, sponge, Vintaj Forgotten Times, Cropadile, metal key accent, Martha Stewart tags, Little Yellow Bicycle-wood shape, sponge, sanding block
Techniques: Sponging

Read more: http://www.splitcoaststampers.com/gallery/photo/2392866#ixzz2d2b3mJA5

Friday, August 23, 2013

More Mixed Media

     Friday has become my mixed media day as I like to play in the Mixability Challenges on splitcoaststampers.com.  Today our challenge was to use fabric.  I also like to play along in the Queen for the Day Challenge and we are currently reviewing past queens. I chose to CASE a beautiful mixed media card by Lee-Anne/Shadow's Mom.
It looked like Lee-Anne used a print dp, but I went with a dictionary page. I used white Gesso as my base coat then used my foam brush to dab some Grey Gesso through wire mesh. I didn't do so well on my first try so I wiped off the grey mess and tried again. As I wiped with an old wipe that had blue ink on it, the blue bled into the Gesso-how cool is that!  I added a bit more Island Indigo along the edges and also stamped my image and sentiment in the same.  My fabric piece is a denim strip and a rolled denim flower. I simply snipped my strip about every 1/4" and then rolled it up and smooshed it onto a circle of sticky sheet.
Stamps: Stamper's Anonymous - Studio 490 Small Stamp Set - Homemade Art
Paper: Black, Dictionary Page
Ink: Island Indigo
Accessories: White and Grey Gesso, foam brush, wire mesh, sponge, sticky page, denim strip, Stickles
Techniques: Rolled Fabric Flower, Sponging, Stencil, Mixed Media

Read more: http://www.splitcoaststampers.com/gallery/photo/2415212#ixzz2cqHsgxlh